Cara Install Windows Xp 64 Bit
Note Windows XP is no longer supported by Microsoft. We recommend you upgrade to Windows 10, which is supported and includes the latest version of the.NET Framework. This document is provided solely as a helpful troubleshooting guide. The.NET Framework is required to run many applications on Windows. You can use the following instructions to install it. You may have arrived on this page after trying to run an application and seeing the following dialog on your machine. These instructions will help you install the.NET Framework versions you need.
The is the latest version. It is not supported on Windows XP and Windows Server 2003.
So get ready for entertainment. You can also download this movie in HD quality. TamilRockers Idhu Kathirvelan Kadhal Full Movie Download Idhu Kathirvelan Kadhal Full Movie Free Download Idhu Kathirvelan Kadhal Tamil Full Movie Download Tamilrockers Idhu Kathirvelan. Tamilrockers hd movies download 720p tamil sarkar. Idhu Kathirvelan Kadhal Full Movie, Download the latest released Bollywood HD Movies, Games and Software directly from Torrent.
It is included with and.NET Framework 4.0.3 The is the latest supported.NET Framework version on Windows XP and Windows Server 2003. The.NET Framework 4.0.3 requires that the is installed first. Both of these.NET Framework versions are no longer supported by Microsoft.NET Framework 4 You can install the on Windows XP.
If you have a Microsoft Fingerprint Reader, Microsoft will tell you that it won't work with Windows 7. If you try to install the driver software anyway, Windows blocks it for 'compatibility reasons.'
It's no longer supported by Microsoft.NET Framework 3.5 You can install the on Windows XP. The.NET Framework 3.5 can be used to run applications built for.NET Framework 1.0 through 3.5. See also Feedback.
Printer Install Instruction Sheet Windows XP Edition PLEASE USE AN ETHERNET CORD FOR ALL PRINTER INSTALLATIONS. DO NOT USE WIRELESS. STEP 1: Getting the driver. Click (or for 64 bit users) to get your driver. You should see a window that looks like: (Note that this may look different in different web browsers, e.g.
Firefox or Internet Explorer, etc.) 2. Click the Save File button.
Save the file to your desktop for ease of use. When the file is finished downloading, double click the file on your desktop or in the downloads list.
You may have this box pop up: If so click the Run button. The file will open in one of a few different extracting programs, however the dialog box should look very similar to: 4. Notice that the folder is listed as C: temp z46138L6. Remember the folder C: temp z46138L6 32bit or 64bit for 64bit users. You have completed step one.
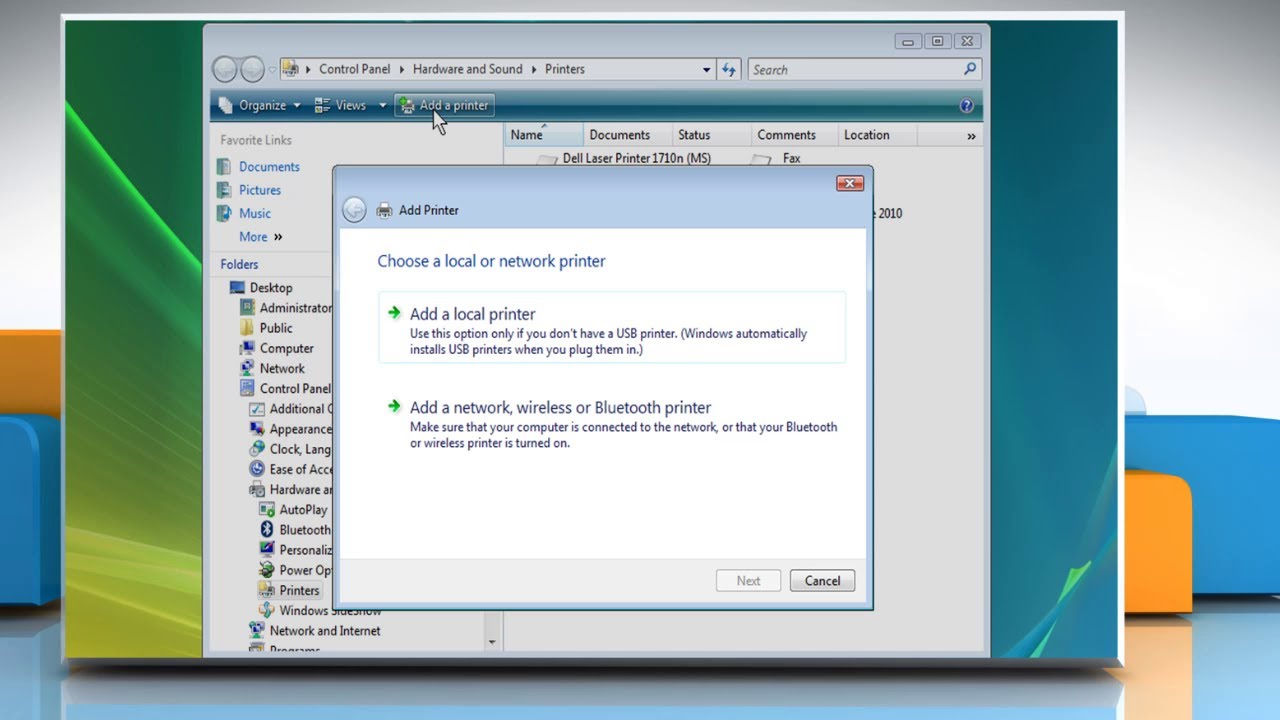
STEP 2: Installing the printer. Note that this can ONLY be done after the new printer has been delivered and set up. Make sure you have fully completed step one before attempting.
First click the Start icon on the bottom left-hand corner of the screen, and then click Printers and Faxes. Click the Add a Printer button: If you do not see Add a printer, click file in the upper left, and then click Add a Printer.
Click Next, and then select Add a Local Printer (I know you may be tempted to add a network printer but that is not how this is set up). I recommend un-checking the box that says automatically detect and install my Plug and Play printer, since this will only slow you down. Select Create a new Port and in the drop down menu select Standard TCP/IP Port: Click the next button. Now for the first of two tough steps. You have to locate the name of your printer.
This should give you which printer name to use. Look through the table to find your department and location of printer. Then copy the entry in the Host Name of Printer column. Copy the printer name exactly as listed.
For example if you are in the Math department you need to type Math-mfp.math.wesleyan.edu. If you have done this step correctly you should get a window with a finish button in the bottom right. When clicked it should bring you to this window: Now select Have Disk If you got this window instead: Click the back button and try typing in the name again. If you still are having issues first check with other users in your department to see if they are having similar issues, then check with your DSS to make sure that the name is correct. Now the second tough part, navigating to the folder.